
Elmo and Cookie Monster - Quilt #6

April 2018.
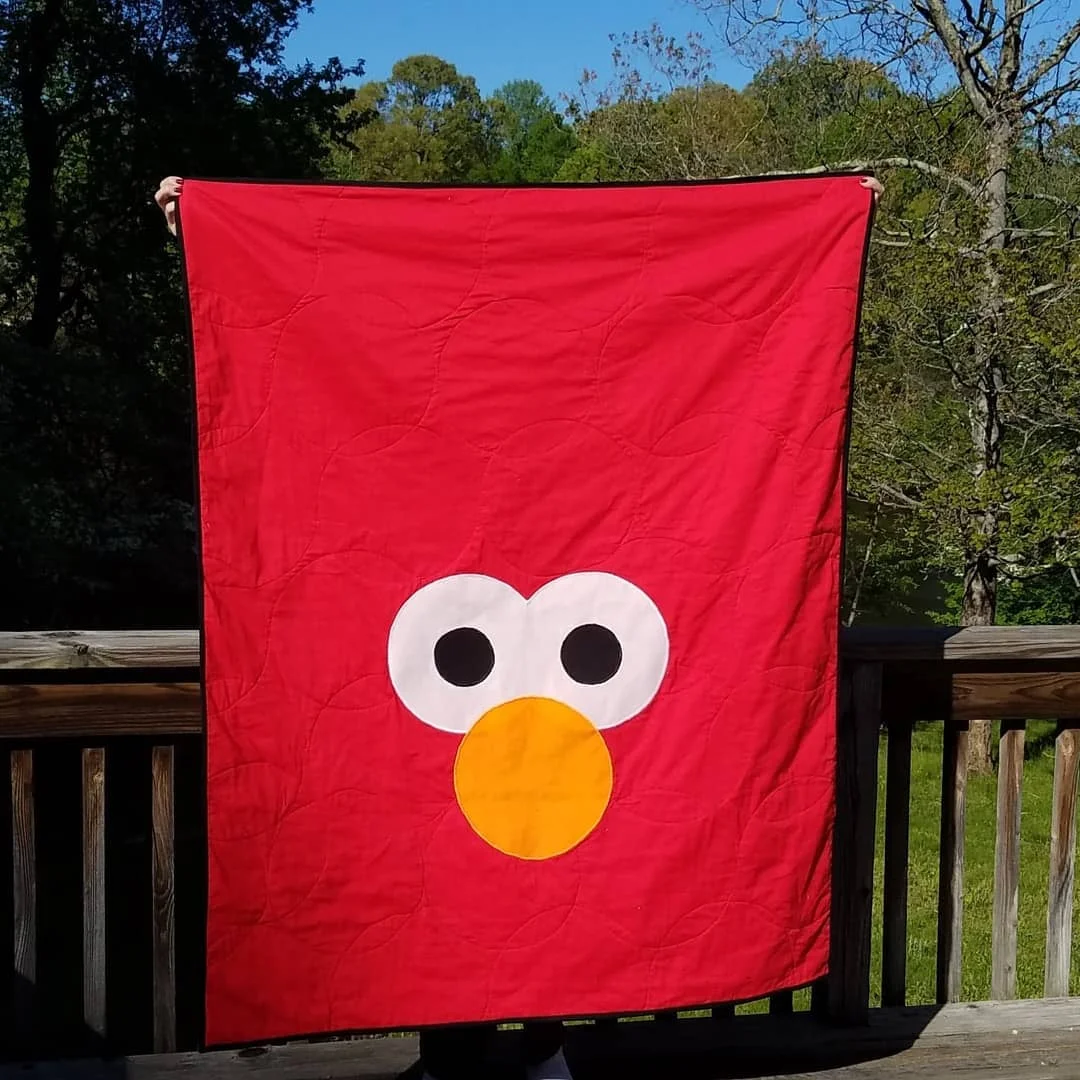
This quilt was for my nephew who loves Elmo!
I was searching Elmo bedding online to see if I could find a some bedding that he would like. I found a cute Elmo quilt that was super simple in construction. It was a solid red quilt with Elmo’s eyes and nose on it. There was also a Cookie Monster quilt, very similar to the Elmo one, but in blue.
When I saw the Elmo quilt, I just knew I could make it! I thought it would be easy enough to cut circles and appliqué them on. Then I thought, what better thing to do than not make just one quilt top, but two, and make the quilt reversible!
To make this quilt, I grabbed my favorite quilting solids, Kona Cottons, for the backgrounds. I used the reddest red and the bluest blue I could find. I also knew that a black binding would be a great way to tie the two quilts together. After gathering supplies, I started working on the circles I would need for the fusible appliqué.
First, I ironed my white, black, and orange fabrics. Then, I ironed some Heat n Bond Ultra Hold to each fabric. Next, I used a dinner plate to outline the cut lines for the white and orange circles and a water glass for the outlines of the pupils. Then, I cut very carefully along the marked lines.
I started with the Elmo quilt top when appliquéing the eyes to the background fabric. I centered the pupils on the whites of the eyes, fused them in place, and used my sewing machine and a wide satin stitch with black embroidery thread to slowly go around each pupil. Then I got the eyes positioned exactly where I wanted them on the red fabric and pinned them all over so they’d stay in place. Next, I took it to my ironing board and fused down the eyes. Then, I used white embroidery thread and slowly satin stitched around the whites of the eyes. Next came the nose. Again, I placed, pinned, ironed, and sewed. The Elmo side was complete!
Now for the Cookie Monster side. I found this side to be a little bit more challenging because Cookie Monster’s pupils aren’t as symmetrical as Elmo’s are. They are a very distinctive feature of Cookie Monster and I wanted to be sure I got it right! Once I was pleased with the placement of the pupils, I repeated the same process that I did for Elmo. Fuse down the pupils and satin stitch with black embroidery thread slowly around them. I used the Elmo side as a guide for where to place the eyes on the Cookie Monster side. Next, I placed and pin the eyes, ironed them into place, and satin stitched around them.
Now both sides were complete and I was ready to start quilting! I pinned the sides together with quilting pins and used the same dinner plate to draw circles for the quilting. This was a new challenge for me because I knew I didn’t want to sew around each marked circle and have to tie off. I ended up traveling in sort of an S shape and it worked really well! I also did not quilt in the eyes!
Oh, and something else I did for this quilt; I really wanted to make it reversible so I wanted to use red thread on the Elmo side and blue thread on the Cookie Monster side. To do this, I knew to use red thread in the top of my machine and blue in the bobbin (I quilted with the Elmo side facing me). My machine tension would have to be perfect so that the stitches met in the middle of the quilt and the opposing colors didn’t show through to the other side. Thankfully, my tension was perfect right from the start and I had no issues!
For once, I made a quilt that cost way less than buying it in the store, and better than that, it’s completely reversible!
This quilt went better than I could have hoped! I was attempting a lot of firsts and had a very specific vision in mind. It was my first attempt at self-guided appliqué and using two different color threads to quilt a quilt! Best of all, my nephew loved it, and though he was only one-and-a-half at the time, he knew immediately it was for him!